GRC Cladding has become more and more popular choice as an architectural finish material. People consider Glass fibre reinforced concrete cladding as a relatively new type of construction material. Although, the construction industry has been using it for over 50 years it’s only getting more attention in the 21st century. GRC cladding is very versatile and that is why it’s gaining popularity among architects and specifiers. Due to its high elastic properties designers use GRC cladding in solutions where resistance to live loads is necessary.
GRC cladding systems require high quality standards in manufacture and meticulous record keeping. If you use glass fibre reinforced concrete cladding or panels in your projects it is important to employ subcontractor or installation crew with GFRC cladding experience.
Our previous article concentrated on the processes which were mostly carried out off site. This post will focus on works in relation to the GFRC cladding installation on site.
How to install GRC cladding panels?
It’s not easy to answer such question in a short way. Every project is different and every design is different as well. However, there are some common parts which you can apply to various GFRC cladding projects.
Before you start with any installation be sure that your design is verified against compliance with the project specification and architect’s requirements. It is not enough just to get design acceptance. You should also make sure that you can meet all the testing criteria. What is more, it is crucial to check how easy or how complicated it is to build GFRC cladding according to the design. For such an activity you can build a mock-up or a prototype.
Safety documents for GRC Cladding panels installation

The first step for us, prior to any work on site, was working out the methodology of installation of GRC panel cladding. Later it naturally led to preparation of suitable safety documents. For this task we engaged with our client. We visited the site to get familiar with the access, egress, transportation routes and installation area limitations. With over 300 types of different types of GRC panel cladding we had to take every step of transportation and handling into consideration. It was crucial to plan how to build suitable timber crates. Additionally, we planned how to fit these crates around every corner of the construction site until these are transported into the final installation area.
Lifting equipment for installation of GRC cladding
After we acquainted ourselves with the site we were able to select the suitable access and installation equipment. Some of the GFRC cladding panels weighted over 50kg and were not suitable for manual handling. Thanks to our colleagues from the Research & Development department we identified a few pieces of lifting equipment that were just right.
There were also several GRC cladding panels weighting around 180kg.
We decided to use Winlet 575 machine manufactured by Wienold. Our partner in lifting equipment, Hird, supplied it, maintained it and repaired it for us. They also installed a custom frame with suction pads in Winlet machine.
Hird supported us from the very beginning of the project. They tested several frames and different types of suction pads. We had to make sure that we meet all safety requirements for the installation of GRC cladding panels.
Thanks to an electric forklift from Jungheinrich we were able to handle and install the heaviest panels with the weight of 600kg.
How to install GRC facade cladding?
We used above methods for internal concrete cladding. GRC installers can use similar lifting procedures for GRC facade cladding.
You can lift GRC cladding with vacuum suction pads and attach these to a spider crane or another piece of lifting equipment.
Which lifting attachment is most suitable for GRC cladding?
You need to verify it with your designers and installation team. There are several factors which may impact your decision. These might be location, height, surroundings, experience of your fixers, sizes of panels and many more.
You can choose between lifting attachments with suction pads. Nevertheless, carry out a few trials to make sure you use the right pads and that GRC cladding does not fall.
For large and heavy GRC cladding you can use spider cranes, mobile cranes, tower cranes with suitable attachment. This could be a custom lifting frame or a spreader beam.
If GRC cladding is part of the unitised facade, than the supplier should prepare lifting points. You can use these points to attach slings, chains or other suitable and tested equipment and lift the unit into position.

Survey prior to the installation of GFRC Cladding
Another important step for GRC cladding installation is survey of the fixing area.
We recommend to do it prior to the design work in the locations where GRC panel cladding and substructure will be installed. It is necessary to understand the fixing ground and tolerances of the installation area.
Whether it is an internal cladding panel or a façade panel you should follow the setting out and relation to the architectural grid lines.
Our colleagues from Noack Engineers carried out series of surveys which included scanning of raw tunnel structures and also scanning of as built position of MEP items.
The surveyors used various pieces of equipment like Trimble S7 station.
In some instances we carried out concrete reinforcement survey. Our client did not want that we drill through the rebars. Therefore, we mapped out the position of reinforcement with ground penetration radar with the help from Sandberg surveyors. Afterwards the operatives drilled in between the surveyed rebar locations.
Designing concrete cladding systems around the tolerance issues
Why is this relevant? If you fix your GFRC substructure to the tunnel walls you want to ensure that these walls are in the place where they should be. If these are installed out of tolerance it can cause installation issues.
When the walls deviate and are further back to the designed position it may require different substructure and fixing method. Increased distance can involve higher loads affecting the substructure.
On the other hand, when the walls are in front of the designed position it may mean that the concrete cladding panels and substructure will not fit or will clash with other elements.
This should also be checked with building or structure fire regulations. Some buildings require specific dimensions for the escape routes. s
If you install concrete cladding on a wall which is in front of the designed position you may interfere with the escape route. What is more, such installation may cause clashes with other structural or architectural items.

Due to the potential issues arising from the fixing ground tolerances it is important to design some sort of adjustment in the GRC wall panel cladding system. This way you can accommodate tolerances from survey and manufacture during the installation phase.
Once we completed the survey of the installation area it was time to analyse the collected information. It was a desktop exercise and we overlaid point cloud with the architectural 3D model. Our designers spotted the areas which could cause installation issues and designed suitable custom solutions for almost each case.
In some instances it was not possible to overcome the out of tolerance issue with our design. Where the tunnel wall was over-sprayed and too much in front of the designed position it had to be scabbled back locally.
Recently, we also worked on a facade project with similar issues. We could only install GRC brackets to a concrete slab. Concrete works contractor did not pour the slab as per the design and out of tolerances. In such a case in several instances they carried out remedial works and scabbled back the slab. In areas where the slab did not reach its designed position the cladding installer used metal shims. These shim compensated for the missing distance and also allowed for proper load transfer to the building structure.
Setting out prior to GRC panels installation
After the fixing area was prepared for installation our surveyors returned to site for setting out works. Using co-ordinates from the architectural design they marked centre lines of the substructure frames and location of the fixing points.
Safe access for GRC panels
When it comes to access to work area we had to consider several options. Different parts of the site required different access. We worked on platforms and in the tunnels where we utilised scissor lifts or podium steps.
Scissor lifts were supplied by Star Platforms who offer great service in terms of quick operations and large fleet available. They always had an engineer close by the site and reacted in a swift manner to any repair and maintenance needs.

Another area which caused access issues were escalator shafts. We worked there before the installation of escalators and afterwards. In these areas we used several means of access such as PASMA towers, escalator towers, incline hoists with working platform and standard tube & clip scaffold.
Installation of GRC cladding panel substructure
Our substructure arrived to site almost like flat packed furniture from IKEA. This allowed us to minimise the amount of deliveries and to reduce carbon footprint caused by the delivery vehicles. We assembled the components on site in a small pre-fabrication area. GFRC cladding substructure sections were transported to the installation area manually or on trolleys.
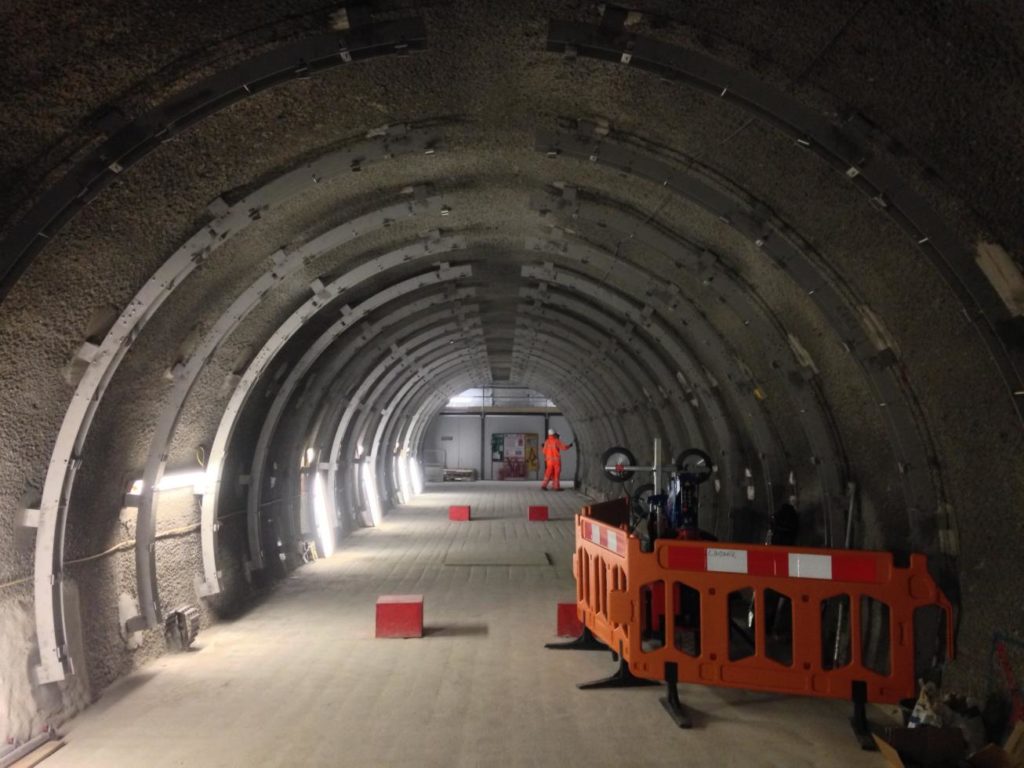
In order to install GRC cladding subframe we had to fix several thousands of anchors into the sprayed concrete lining.
Our installation team had to control several setting parameters like edge distance, bolt to bolt distance and drilling depth.
For this instance our structural department carried out structural analysis in order to determine applicable loads affecting the substructure.
Our customer had another issue, they didn’t want us to penetrate through the waterproofing layer which was approximately 200mm under the face of the sprayed concrete lining.
Installation of concrete anchors
Once we recognised the loads and dimensions we were able to select suitable anchors. This time we chose Hilti expansion anchor – HST3-R for most of the locations.

Installation of these anchors was kind of a project on it’s own. Correct setting of the anchors required detailed planning, installation team training and quality checks in several steps.
Our operatives torqued each anchor to the required level with a calibrated torque wrench. For example, the torques for M12 anchors were 60Nm and for M16 – 110Nm.
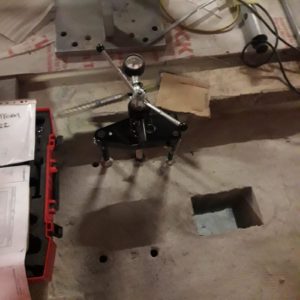
Pull out test for GRC panel cladding substructure fixings
What is more, our customer required that we test our anchors for pull out. This requirement followed Construction Fixings Association (CFA) guidance note for site testing construction fixings – 2012.
We studied CFA requirements and carried our structural calculations. Afterwards we determined that the pull out load in the tests should be 10kN.
There were several instances where GRC cladding substructure consisted of heavy steelwork. Our structural department calculated loads for pull out tests individually and some results reached to almost 50kN.
An accredited test house carried out the pull out tests on site. In our case we selected CRL – Concrete Repairs Limited who attended the site several times with various pull testing equipment. For most of the pull tests we used small and compact testing equipment – Hydrajaws 2000.
In all the tests there was only one single failure. In this case the anchor was cut flash with the concrete substrate and another anchor was installed away from the disengaged anchor. Afterwards, another pull out test was successful.
Details of handling and installation of GRC cladding panels
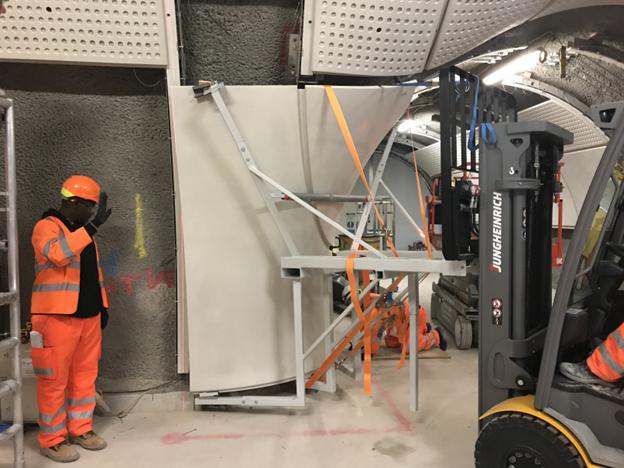
Once we installed the substructure and levelled in the next step we wanted to install GRC cladding panels. The logistic team delivered GRC cladding to site in timber boxes. Next they offloaded the boxes with a telehandler and moved with a crane or hoist to the actual installation area.
The weight of boxes varied depending on the size and shape of GRC cladding. Some packs included smaller panels with the total weight of approximately 300kg. There were several panels which weighted almost 600kg each.
Operatives moved timber crates with GRC cladding on site with a pallet truck (by Sunbelt Rentals). We removed lighter panels (below 50kg) manually from the boxes and later moved these either on a scissor lift or on a scaffold tower.
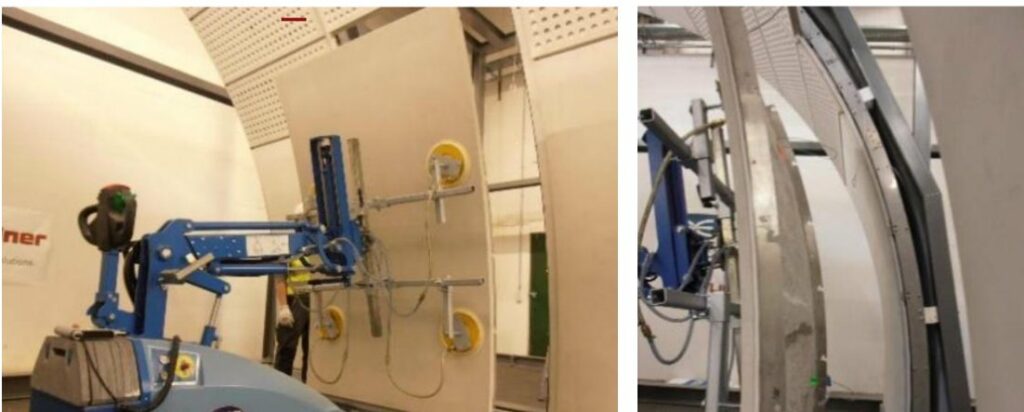
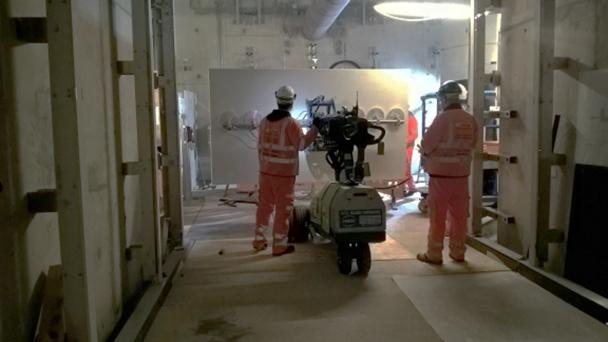
Installation team moved GRC cladding panels which were heavier than 50kg with WinLet equipped with suitable suction pads. Operatives who worked with the glazing robot attended familiarization training prior to site trials.
WinLet glazing robot allowed for easy handling of GRC cladding. For example we could remove heavy panels from the storage box, rotate it, move it and install it on the substructure.
Preparing GRC cladding panels for installation
Some GRC cladding panels required extra assembly of some parts, for example acoustic panels. Operatives on site installed the sound insulation from Rockwool, secured it in a panel and also fixed an inspection cylinder. This part allows for inserting borescope through the panel for visual check of the substructure and elements behind the cladding without removing a single GRC panel.
GRC panels included cast-in plates with a hook on notch. This allowed for the panel to be hooked on the subframe without additional moving parts.

Safety tethers and locking mechanism provided additional security for GRC panels.
When operatives put the panel on the subframe they aligned it and set the panel in level.
In several instances we surveyed cladding in reference to the project grid-lines and datum level. If a GRC panel was too high or too low we adjusted it to follow the architectural specification. We followed these architectural requirements which you can find in the GRCA specification.
On-site repairs of GRC wall panels
It is nearly impossible to handle such a high quantity of fibre reinforced concrete cladding in a tight environment and do not make any scratches or damages.
Different trades or access equipment occasionally hit, scratched or chipped some of the panels. With all the small damages it is possible to make local repairs on site.
We developed a suitable repair procedure and a team of trained operatives worked on fixing the minor damages.
Quality Assurance during GRC panel cladding installation
Our customer and the end user of the facility had high quality standards. Quality engineers inspected each step of installation and recorded their findings in the installation QC check sheets.
For some of the quality checks our client witnessed the installation or inspections with third parties. For other steps we documented the process and the client checked the paperwork.
We supported our customer with random checks as well. This included torque test of fixings, pull out tests and survey of specific parts.
Our client had also carried out his own quality surveillance of GRC Cladding. We presented the results of such inspection in a report with detailed description and photographic evidence.
Of course we had to do some snagging works and re-inspect the GRC panels.
This article is also available in Swedish.
Do you have a project which requires GRC cladding? Contact us via the form below:
FAQ – Frequently asked questions about GRC cladding:
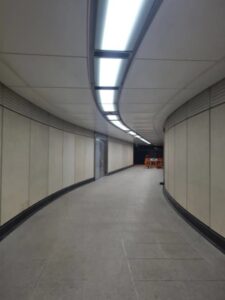
GRC cladding is the secondary skin of a building or structure consisting of GRC panels and supporting structure. GRC elements installed on steel stud frame enable production of a lightweight and strong architectural cladding systems.
GRC Cladding is made of Portland cement, aggregates and alkali-resistant glass fibres, water and some additives.
How to install GRC cladding?
Discuss your project requirements with a professional GRC installation company. Usually GRC cladding suppliers and manufacturers can recommend installation teams.
What are the properties of GRC Cladding?
GRC cladding is characterised by high resistance to live and dynamic loads. It is much more flexible than standard reinforced concrete. In certain conditions it is more resistant to cracks when compares to standard reinforced concrete.
What is the price of GRC Cladding?
GRC cladding cost varies from approximately £100 up to £500 per m2 (square meter). In some cases it can be even more expensive. The higher the performance requirements the more costly it is.
Due to its high flexible strength GRC is predominantly used in facades, cladding panels, building restoration elements, street furniture, planters, electrical cable covers and many other sectors.
GRC cladding elements present higher flexural strength than pre-cast concrete. GRC manufacturers replace standard steel reinforcement with thin and light glass fibres which add to the bending capabilities of GRC elements.
Pre-cast concrete elements require minimum concrete cover for reinforcement depending on the concrete exposition class. Usually it’s minimum of 20mm up to 50mm concrete cover. This cover is necessary to achieve proper bonding between reinforcement and concrete and also to protect reinforcement from corrosion due to water ingress and moisture.
The concrete cover around reinforcement makes the pre-cast concrete panels heavier than GRC elements. GRC can be thinner and lighter in weight which reduces the overall dead load of a specific element or the whole building or structure. Additionally, thanks to higher flexural properties GRC can withstand higher live and dynamic loads.
What does GRC stand for in construction?
GRC in construction stands for Glass-fibre reinforced concrete. It’s concrete with glass fibres used as reinforcement instead of steel rebar. Architects use it for example as a building concrete skin. Designers often apply it for wall cladding, grc column cladding, grc fins and other parts.
GRC cladding advantages and disadvantages
There are certainly more benefits of GRC cladding than negative aspects of it. Although we may be very subjective as GRC Cladding manufacturer we still can find some disadvantages of such a solution.
Main GRC cladding advantages:
- lightweight system when compared to traditional pre-cast concrete panels
- you can design almost any shape and produce complicated elements like curved GRC panels, 3D GRC pieces and double curved tiles
- fire retardant – GRC cladding does not burn nor does it sustain fire
- you can achieve attractive surface textures and colours with suitable treatment
- withstands hard body and soft body impact
- resistant to bomb blast
- can incorporate acoustic aspects to absorb sound
Disadvantages:
- requires high quality procedures, therefore, not many GRC Cladding manufacturers can produce all types of panels
- custom projects with low repeatability can take longer to produce GRC tiles
3 responses